You remember last time... (cue Batman music)
The Swedish infantry had finally come to grips with the Saxons, doing well on the left of the line, but either remaining engaged in mêlée or failing to come to grips on the right. Meanwhile, the Polish cavalry (in particular) were getting the better of the Swedes on their left flank.
We pick up the game/battle in the sixth stanza.
Tempo die rolls were '3' and '4' for Saxons and Swedes respectively, giving six and nine points to 'spend' on winning the initiative and/or sending to sub-commanders. 'Not a sausage' was Augustus' bid, while Charles bid three. Initiative to the Swedes.
The Saxon bombardment was ineffectual.
 |
| The Swedish infantry not yet engaged
attempted to charge again. No go, but they were able to conduct
offensive fire (an option that I had missed in previous turns). |
 |
| The fire was ineffective. The on-going mêlées continued. |
 |
| On the left the cavalry mêlées continued too, apart from a 'recoil' result for one of the bases of Swedes. |
 |
| All of the Saxon infantry that were able fired in their turn... |
 |
| resulting in a base (battalion) of Swedes breaking! |
 |
Flemming's cavalry continued to have some success against Frederick of Holstein-Gottorp's men. (The latter was mortally wounded early in the historic battle.)
|
After part two, I had commented to
Julian that I had been rolling better for the Saxons than the Swedes.
This all changed in turn seven.
 |
| The cavalry that had been made to recoil charged again... |
 |
| breaking their Saxon opponents! |
 |
| The Swedish infantry went in again, with a
battalion from the second line filling the gap created by the broken
battalion from the previous turn. This drew Saxon defensive fire, which
was ineffective... |
 |
| and the Swedes pushed back the Saxon line at a further two points. |
 |
| In their phase, the Saxon battalions fired, but all without effect. |
 |
| It was now a disjointed Saxon line indeed. |
 |
| After two complete turns of mêlée with
no result, these cavalry retired to re-order their ranks (a rule that I
'discovered' just in time!). |
 |
| The number of bases that had routed was basically the same on both sides. |
 |
| While this was going on, Raven (left) and Xena observe a bit of racing action as one of the shed's spiders tried out the chariot racing track. |
 |
Good
tempo rolls by both sides.
I followed Julian's 'command directive', as I
did not think that the Saxo-Poles were in a position to take advantage
of winning the initiative. Swedes won initiative again.
In hindsight,
this was a mistake.
The Saxon bombardment was once again ineffective (bottom dice roll).
|
 |
| Time to get serious. In went Rehnskiöld's cavalry,... |
 |
| while von Liewen's infantry continued or re-entered the fray. |
 |
| Rehnskiöld's cavalry had great success, breaking two opposing bases and driving others back. |
 |
| The infantry attacks were less decisive, save for a Swedish battalion in the centre that broke. |
 |
| On the Swedish left, Holstein-Gottorp's cavalry were looking weak and exposed. |
 |
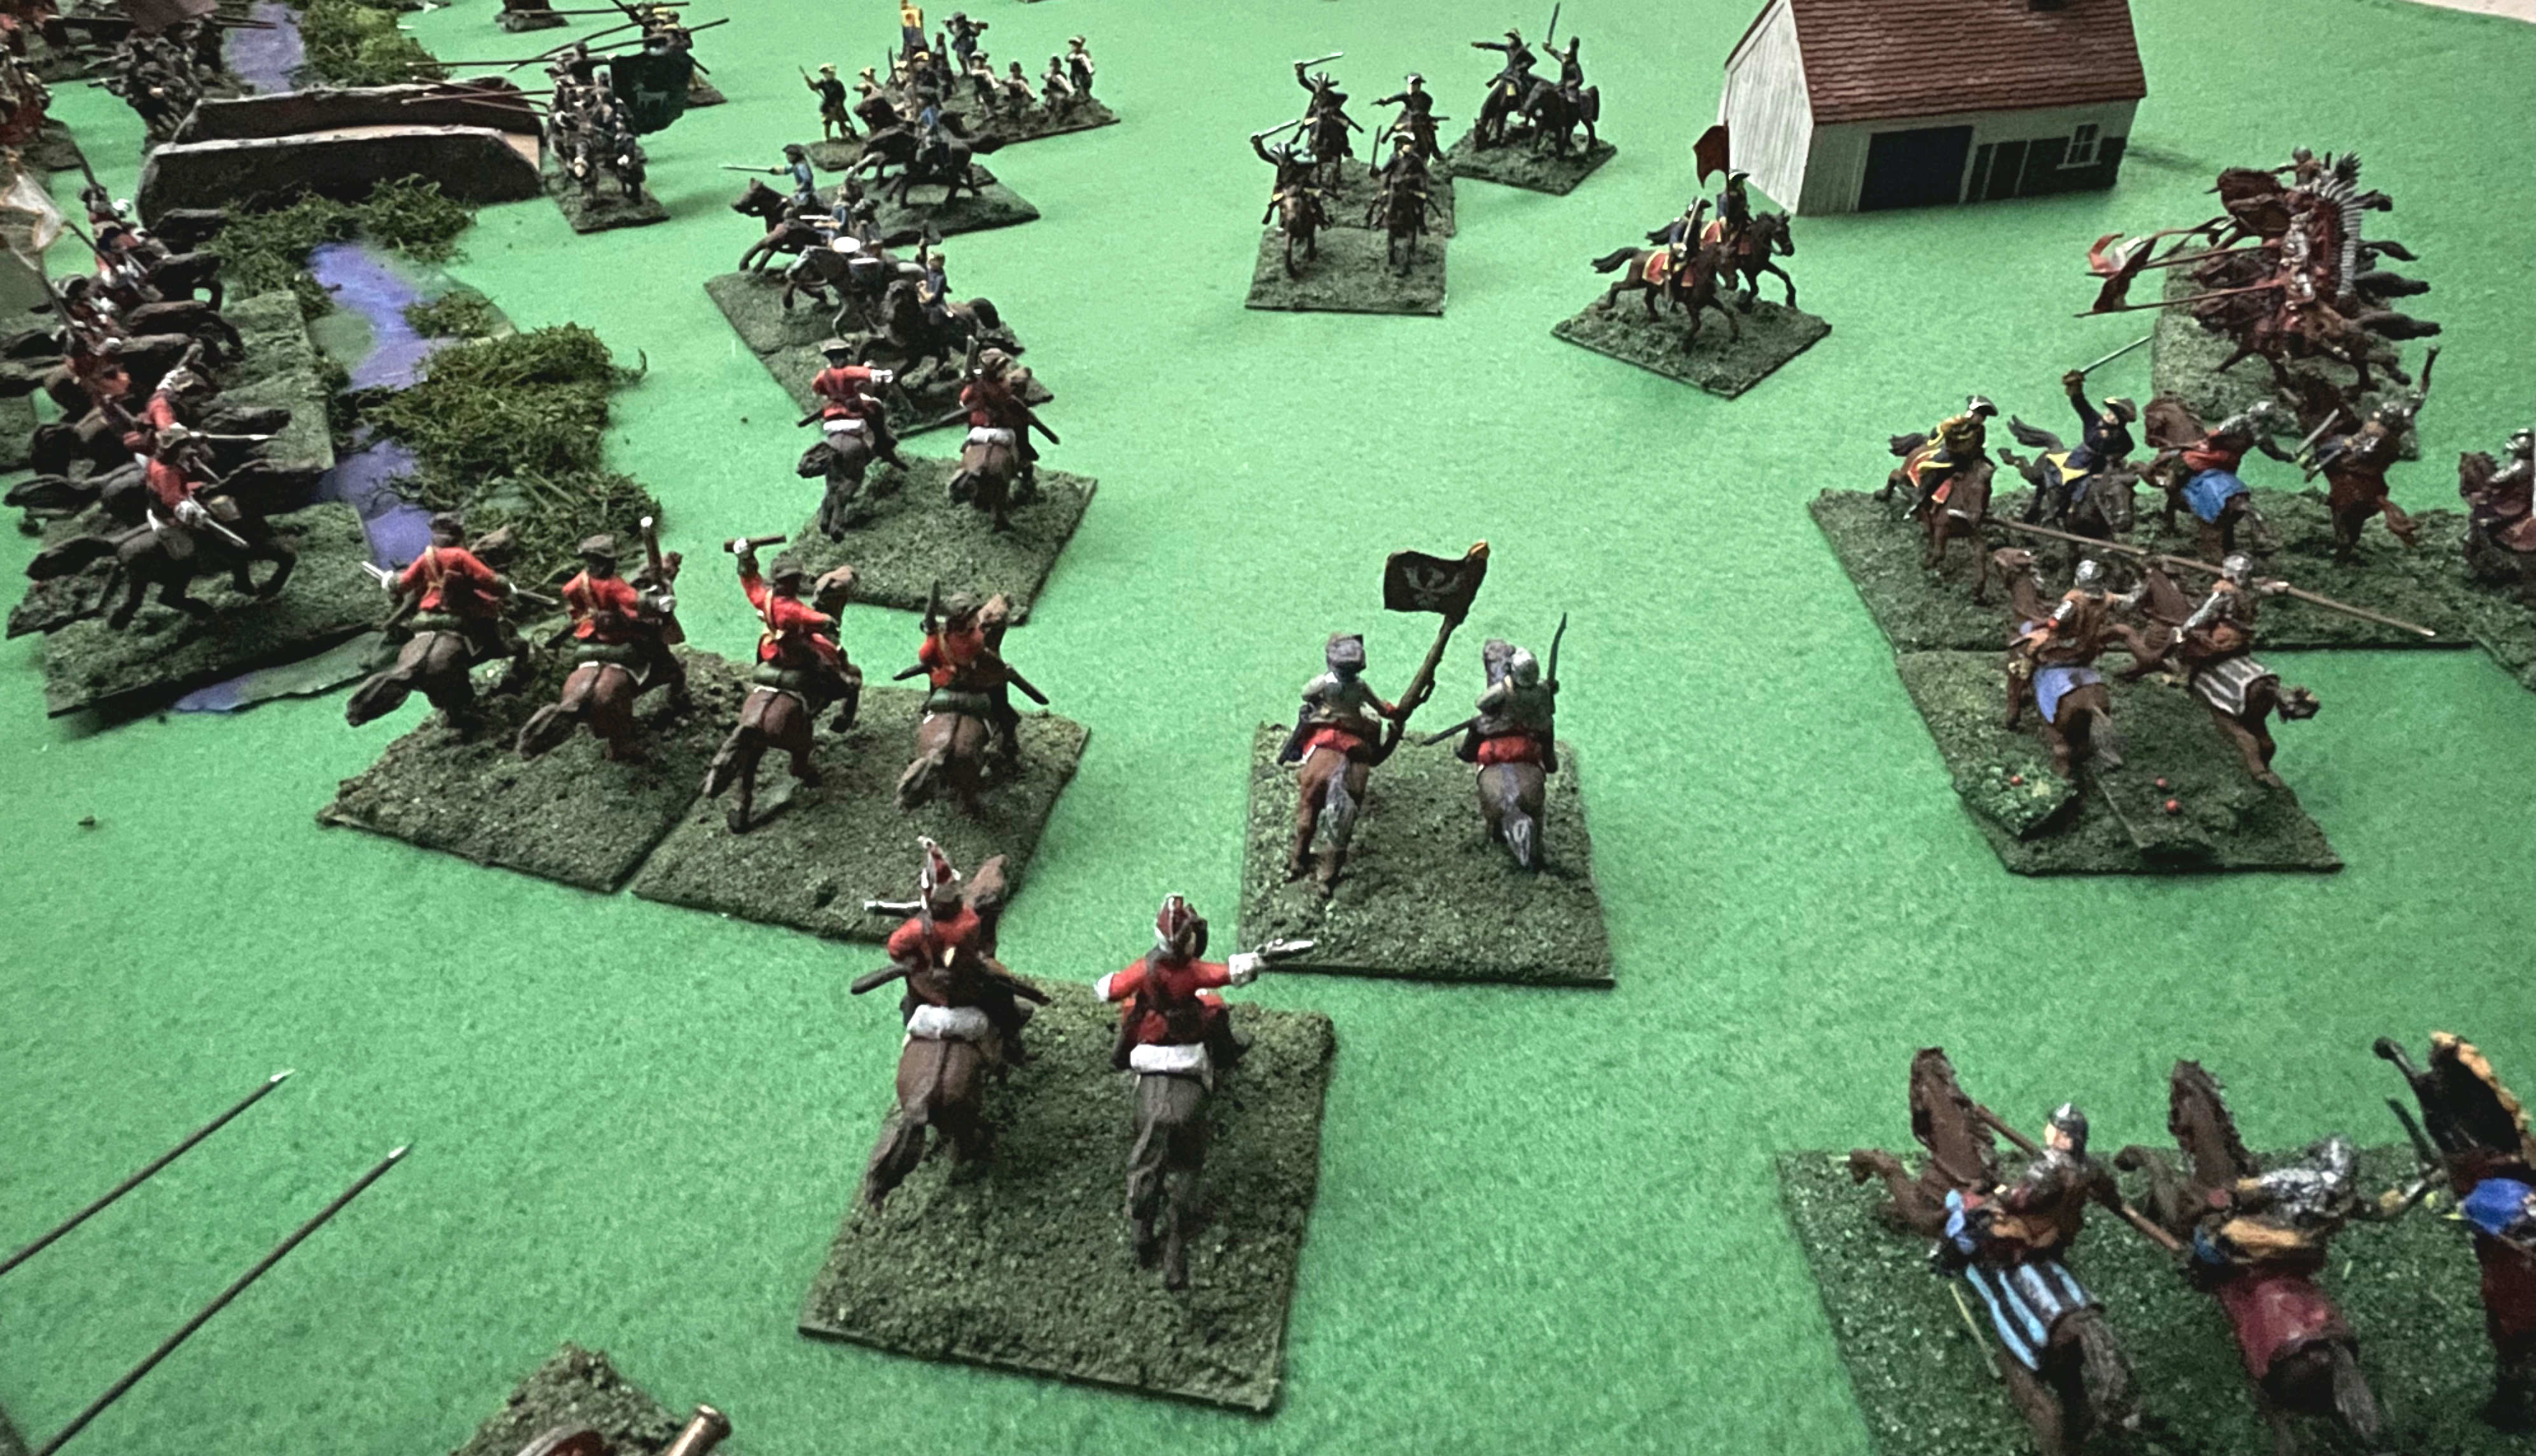
| This is the first of four photos showing the entire battlefield at this stage. Very much in the balance. |
 |
Augustus really had needed to win the initiative. These hussars/pancerni
were in a great position to charge, but, with only two tempo points
available to Lubomirski and three required for a non-tempo unit/group to
charge, could not!
I had previously, erroneously, only 'charged' them
two points to charge. At first I thought that I would let it go again,
but decided to stick with the rules as writ.
At the time this seemed to me to be problem with the balance between the number of points likely available and those required for the non-tempo player. I came to a different understanding as I
went on... (see 'Conclusions'). |
 |
Being closer to Augustus, Flemming's cavalry were able to charge (above) and made good use of the opportunity (below)!
|
 |
| Back in the centre, Saxon infantry fire was once again ineffective. |
 |
| The trend of the tempo die rolls continued in the next turn: no chance that Augustus could win the initiative with these rolls! |
 |
| There was a change for the Saxon bombardment
(ten on the two dice above). The result required the expenditure of an extra tempo point
by the Swedish infantry and produced a shaken level for two units of
the command. |
When
we had played the turn and a bit which began part two of this game, Julian had asked me about
higher-level morale. I thought that it was done at an army level only. When I I re-read the rule, I found that I was wrong. It is done by command and
the opponent 'invites' the other player to test one or more commands; at any time during the turn (only once per command).
 |
| Augustus duly 'invited' Charles to test for Holstein-Gottorp's cavalry. At just over 40% broken or in rout, he failed with a roll of 13. |
 |
| Failure of morale for a command is not an all-or-nothing result as it is in so many rules. There are four levels of result depending on the level of failure. Holstein-Gottorp failed by the smallest margin, resulting in a 'shaken' command and an extra shaken level for each base—causing one base to break. |
 |
| As intended by the rules, this was unsettling for the Swedish command. The Swedish right flank cavalry (Rehnskiöld) and von Liewen's infantry redoubled their efforts, both causing further Saxon bases to break (above and below). |
 |
| What remained of Holstein-Gottorp's
left flank cavalry had a go too, trying to steal a victory, or at least
to inflict damage before a worse morale result occurred. Alas for him, no
against-the-odds wins resulted. |
 |
| With the losses of additional bases, Charles 'invited' Augustus to test morale for Steinau's cavalry and Schulenburg's infantry. Both passed. |
 |
| In the Saxo-Polish phase, two more bases of Holstein-Gottorp's command were routed. |
 |
| The rolls for tempo and bidding for initiative had
been amazingly consistent all game. Swedes took the initiative again. It was back to 'normal' for Saxon bombardment too; no effect. |
 |
| 'Invited' to test morale once more, Holstein-Gottorp's command failed and broke. |
 |
| More of Steinau's cavalry broke before the charges of
Rehnskiöld's troopers (above), the Saxon commander was able to avoid being captured during pursuit (below),
while more of his men broke in mêlée (further below). |
 |
| Another two bases of Schulenburg's infantry were also broken (bottom right of photo). |
 |
| 'Invited' to test morale, Steinau failed. |
 |
| Command broken. |
 |
| Schulenburg's infantry passed. |
It seemed time to call the game. I rolled for tempo
once more, to see perhaps whether Augustus could win it and make
some attacks on the Swedish left. He did not (I thought that I had taken a photo of the die rolls, but hadn't!). Game over.
 |
This photo shows the parlous state of
the Saxon left. The infantry would be encircled in one to two turns by
Rehnskiöld's fresh bases (top left) as well as some of the Swedish
infantry that were breaking through. |
 |
There were plenty of enemy cavalry on the Swedish
left, but Charles had refused that flank and moved the cavalry reserve to face them. Having the
initiative, he would be able to complete the job. For their part, being the non-tempo player, the
Saxons and Poles would not be able to make many aggressive moves in
their phase. They would though, be able to cover the retreat.
|
 |
| Stars of the show: these stout Saxon infantry in the centre of the line, had resisted attack after attack. |
 |
| Despite that, without a left flank, they would not last much longer! |
Wow, what a game and a see-sawing close thing it became. It really drew me in. My intention of simply playing a few turns to experience the mechanics and then packing it up went out the window completely.
Conclusions
After this, the Polemos Great Northern War rules remain very much 'in play'. I appreciated the mechanics more and more as I went on.
The integrated mechanics for firing, charging and mêlée take a little while to work out, but are quite brilliant. The
roll of the die at first seems to be a big factor, but after lots of examples, the balance between the random factor and modifiers for quality, type and situation seemed appropriate.
A result was not determined by the die roll of each side, but they impacted the level of the outcome. Having both sides roll is a mechanic that I like as it produces a random factor that is better distributed. There were no cases where, for example, a unit in a really poor position broke a
better/stronger/better-placed unit. Some close situations were turned to
decisive ones for one side or the other by a large differential in each
side's die roll. I was not annoyed by this, as it allowed for
tie-break results and the outcome was generally a 'recoil'.
Musket fire was not particularly effective in this game, even at close range. This did not seem too out of order. I was particularly good at rolling the same for both sides, often low for both. In addition, as the Swedes sought to come to grips on most occasions, there were not sustained periods of musket fire that could be expected to whittle down one side or the other (or both!). The (mis-named) 'Army Morale' rule is one of the better versions of this that I have experienced. Too often such rules are quite blunt and have a huge impact, suddenly creating giant holes in a line that did not occur in reality. The levels of failure in Polemos Great Northern War allow for a more nuanced result, only becoming devastating when a command is in really bad shape. The rule also has a mechanic for a 'climax test' of an entire army. This would likely have been used if I had played a turn or two more and come to see Steinau's command broken, but I did not get to this.
The tempo mechanic, the defining one of the Polemos rule series, is the one that troubled me the most. Initially it seemed okay. The effect of too few tempo points, even for the Swedes, meant that either only front line troops moved or acted, or action needed to slow down so as to bring up the rear bases. The latter may be the intention, but I do not consider it desirable from a game perspective, nor in keeping with the historical version. My change to make basic movement 'free' seemed to fix this (for me) and did not produce any outrageous results (in this game). My next problem was the huge difficulty in moving bases of the non-tempo player. At first I considered using the same 'charges' for both tempo and non-tempo, but reasoned that this could be quite distorting and also undermined the importance of wining the initiative. This is the key to the mechanic. It is really important to win it, but it can 'burn up' tempo points to do so, limiting what the commander can achieve. I re-read the account of the battle in the Great Northern War Compendium and it seems that this is in keeping with the historical version. Charles had the initiative at the start, moved through the wood and re-aligned the army. Augustus then took the initiative, Lubomirski's cavalry charged, as did Steinau's, with Flemming's following out of sequence (next turn?). These charges did not go as well as expected, Charles won the initiative again and the Swedish cavalry counter-attacked. Taking the initiative again, the coup de grace was provided by the infantry attack in the centre. So, perhaps it is reasonable to put a huge weight on the initiative and to limit the non-tempo player. This helps to give me a greater appreciation of the mechanic, but I am not yet completely comfortable with it. I'll see how I go in later games using these rules.
I will definitely use the rules again. They are a choice of horse for particular course (level of game that I desire). That said, the next game with them won't be for a while, as another game of Klissow, this time with GåPå, is my next plan. For that game the armies need to be expanded for the ~50% increase in scale, which will keep me busy for a bit!


Looks like an enjoyable game with some excellent looking units. Learning new rule mechanisms certainly tests one's memory.
ReplyDeleteYeah, they do a bit don't they? Playing solo I am happy to be a little 'fluid' (within reason) and generally something missed is not critical—just a bit of added randomness?!
DeleteJames, this massive playtest was most enlightening on several fronts. After following along with your battle test, the Conclusions brought home many of these points surfaced during play. I like seeing what part worked and didn’t work for you and how you addressed any shortcomings. While I do not own any Polemos rules, I do have GaPa and look forward to the next test with these.
ReplyDeleteGood stuff and a big effort!
Thanks Jonathan. Your comments, support and encouragement are always a pleasure to read and to receive!
DeleteHaving read and reviewed GåPå in detail and used them once—all many years ago—I have high expectations. There is a pip-like system again, which is not my most desired mechanic, but, as with Polemos Great Northern War, it is more nuanced (better from my perspective) than simply rolling a die or drawing cards. I'll need to read them again, of course.
We'll see in time, hey?!
Thank you James. I found your series enlightening. I don't have Polemos, nor am likely to use them, but I learnt alot about the rules from your informative reports and thoughtful conclusions.
ReplyDeleteIt's one of the many great things thing about blogs isn't it Richard? You can enjoy games of eras, using rules or scales of figures that you'll never use yourself. It does not detract from the vicarious enjoyment one iota!
DeleteGreat to see a GNW game James, and the Swedes victorious, which is a bonus for me (and a result that seemed in some doubt at some points in the game!) The only rules I have played for the period are Barry Hiltons Beneath the Lilly Banners (and that was a few years ago now) so I will be interested to see your GaPa play test in due course.
ReplyDeleteThank you Keith.
DeleteYeah, I nearly beat myself (again)! It was a real roller coaster for me as I had expected to merely do three turns, have the Swedish infantry smash through and move on. Those Saxons defended well and their cavalry on the right caused some mayhem—which had been Julian's cunning plan. I probably should have 'unleashed' Rehnskiöld sooner, but considered that the infantry needed to have a foot-hold first. It will be interesting how it goes with GåPå. It won't be a balanced test though, as I plan to begin the game earlier in the day with the Swedes on the other side of the wood (that was off-table behind the Swedes in this game).
Beneath the Lily Banners is not one you'll see played here. The Great Northern War is very much of an add on, but chiefly as they have too many mechanics that do not appeal to me!
Cheers, James
A very exciting game. It is easy in reflection to know why the Swedes won. It is the flags and standards! Clearly they are of better quality and even had designs on them. The Poor Saxons and Poles, for the most part, had plain coloured flags.
ReplyDeleteThank you. A keen observation. it will be interesting to see whether the Saxons and Polish can do better next time when their banners will be completed! :)
DeleteI thought that I wrote here but I missed it. I find it very interesting how you dealed with the battle of Klissow. The Saxon army is interesting and I naturaly could learn about that army for example at the fortress of Königsstein.
ReplyDeleteYour game is very exciting. In my opinion it's difficult to win with the Saxons if we take in account how bad they performed in many battles.
Thank you for commenting (again)! I think that you did comment, but it was the previous game of Klissow? They looked much the same with the same figures and terrain pieces—just an increase in scale. (A third is in preparation and will be the same but bigger again).
Delete