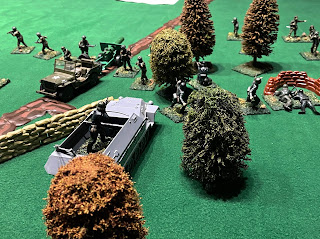
This post is one out of sequence: a few turns of a Second World War game. It is clearly not related to my focus on the First World War and 1916 in particular, but does go back to late 2019 when I had painted and based some of the 1/32 figures of my youth (plus a few that I purchased to supplement them). These figures had sat, patiently, in one of the cupboards in my shed waiting for a 'run' on the table. Current projects and my focus meant that I had nothing planned for them in the near future. Then, enter my good friend serendipity.
Early last month, I was looking over some some of the many blogs that I follow and stumbled across a review of the rules All Hell Let Loose by the 'Emperor' over at L'Empereur Bête et Méchant. They sounded quite interesting, so I looked into them further, including looking at one of several links he had included; to the blog of the rules' author. I was further encouraged by what I read so, since they are available in a form that includes a pdf download and printed version, not super-cheap, but 'reasonable', I decided to get a copy.Reading them convinced me that they could be worth a go. I had intended my activities for the Second World War to be at the squad level, but these rules, nominally company level for games from division to corps size, would allow games at these higher levels of operation. Even better, they have been written so as to be completely scalable and 'scale agnostic'. I decided to take the latter concept a step further and use the rules, pitched at 6 mm figures, with my 1/32 scale figures!
When I mentioned the idea to Julian he was super keen. We were getting together for one of our roughly monthly sessions, so it seemed an opportune time to try a few turns.
I set up a scenario loosely (very loosely) based on the advance of the 1st and 3rd parachute battalions following their landings on 17th September 1944. The paras were advancing towards Arnhem, having just passed through Wolfheze and would be opposed by German forces in the wooded areas to the east.
 |
| Battle of Arnhem 17th September 1944 (Source: Wikipedia) |
We had a long catch up, dinner and a lot of 'chewing the fat', so only had time for a few turns, just managing to begin the action. We took a parachute battalion^ each, both deciding what the Germans should do. Julian carried out the firing and managed three hits from six platoons; 'destroying' one para—one of mine!
^ Re-reading a bit of the rules, these two 'formations' would be better considered to be part of one of the para battalions. This makes the scale more appropriate too.
 |
| Paras advance, not knowing that German troops await in ambush in the wood. |
 |
| The first German formation springs the trap. |
 |
| Six platoons fire on the paras. |
 |
| Three successful hits, resulting in one platoon 'destroyed' (which represents no longer combat effective). |
This was sufficient to demonstrate the potential of the rules and, pleasingly, that they could work with the 1/32 figures. I'll play a few more turns later and see how it turns out.


No comments:
Post a Comment